Friday, December 23, 2011

Telescoping Christmas Card

I am finally on holidays from work - yeah.  I am not going away, so I am so looking forward to spending some quality time in my craft room.  I did notice my blogging this year has been a bit lacking so my sincere apologies to those who follow my blog - one of my new year's resolutions will be to a bit more regular in posting in 2012.

To my card - I have been wanting to try out these Telescoping cards for a while now and since I was missing a Christmas Card, decided to give it a go this morning.


I used a number of different dies to create this card plus the Circle Scissors to create some of the circles.  I decided the bottom scallop circle was a bit boring, so use the Crop-A-Dile to add some decoration, I then added some two-way glue pen on the edge so that I could add some dazzling diamonds.


When you pull the ribbon at the top it opens up to show the 3 different panels.  You just have to remember that the middle panel needs to be upside down when you layer them on top of each to put the brads in.

I think these types of cards will definately be on my list of "to do" items in classes in 2012.


I thought I would give you an idea of what my desk looked like after getting (the majority) of my Christmas crafts and goodies completed.  The small little patch at the front of the desk is where I worked!!!


I spent about 3 hours cleaning up my desk on the first day of holiday - I always find I can be more productive when everything is back in its place.

Tuesday, December 6, 2011

More Miriamthiums

I did get on a bit of a roll with these gorgeous flowers by Miriam Spiess (see here).  I pulled out a favourite gift bag design and the pillow box to showcase these flowers.


Apologies the photo is a bit 'glarey', I used the gorgeous flocked paper from the Mocha Morning Specialty Designer Series Paper and Basic Black Satin Ribbon.

The flower is made from Cherry Cobbler and I have sponged the edges in Cherry Cobbler too.  The Antique Brads work perfectly with these flowers.

I made the flower for the pillow box using the standard scallop punch and a flower from the Boho Blossoms punch.


Wednesday, November 30, 2011

A Vintagey Treat Holder


I am inspired by Kimberley Van Diepen (a US Stampin' Up! demonstrator), and some time ago I made this little treat holder which was inspired by her style.

It uses the Two Tags Die - I cut 2 of the tags which fold, and joined the flaps together to make a triangle.


The DSP is now retired but the ribbon (in Cherry Cobbler) and the embellishments are all available - Vintage Trinkets and Antique Brads.


I cut the ribbon in half and frayed is a little to give it a more rustic look.

Sunday, November 27, 2011

Super Quick Birthday Cards

I was inspired to make this set by the talented Dawn Griffith (see her post here).  These were so quick and simple to make and are great for that quick little card to add to a birthday pressie.


The cards are 3" x 3" and I used the Designer Frames Embossing Folder to create the embossed oval.  The ovals are punched using the Extra Large Oval Punch from Mocha Morning DSP (as everyone probably knows by now - one of my favorite DSP's).  The Happy Birthday is stamped and punched using the Word Window Punch, and I added a teeny flower from the Itty Bitty Shapes Punch Pack and a Pearl Basic Jewel.  As you can see I also decorated the flaps of my Mini Square envelopes to match.


I also made a little bag to store them all in.  This was another quick and simple project, designed to co-ordinate with the cards.  I used the Fancy Favor Die to create the bag, matched the front and created a handle for it.

Monday, November 21, 2011

Stampin Up Regional Swap - 3D

This is my other swap for the Stampin' Up! Regional event in Melbourne. I made the mini milk cartons that are in the same style as the Tiny Tags I made some time ago (see post here). They were quick and simple to make and of course they are the perfect size to hold a chocolate santa.


I think I have got carried away with this style as I have now made - mini post-it notes, chocolate slider, boxes, milk cartons, and I'm sure that this style will work just as well with the new Candy Wrapper die that will be available from the 1st December - must put that on my list to make. At some stage I will take a photo of all the different items I have made in this style (its just as well they are all small otherwise they may not fit in a photo!!).

Thursday, November 17, 2011

Regional WOW

As I mentioned I attended the Regional Stampin' Up! event last weekend and I have to say the WOW demonstrations were all fantastic. There were a number of projects that I just had to go home and make and this flower was one of them. It was created by the very talented Miriam Spiess (check out her blog here). She is hoping to put a tutorial on her blog soon so keep an eye on it.


Here is a close up of the flower.

I made the flower using Elegant Eggplant cardstock which was sponged with Night of Navy. The box is made using 5 of the Petite Pockets, and I used the base as a template for the top.

The paper is from my favorite DSP - Morning Mocha and the brad is from the Antique Brads.

I got on a roll making these flowers in all different sizes and colours and now have made quite a few which are sitting on my desk waiting to be used on something - this weekend!

Monday, November 14, 2011

Melbourne Regional Swap

On Saturday we had the Melbourne Regional event for Stampin' Up! It was so much fun catching up with friends, learning some awesome new things, making some cute projects and 'swapping'.

I made a card swap and a 3D swap this year, this was my card swap. Unfortunately I forgot to take photos of my swaps before Saturday, but managed to keep this one. I will need to recreate my 3D swap.


I used Concord Crush cardstock, ran it through the Stripe embossing folder, and used my brayer with Concord Crush ink to make the stripes pop. I added a top note die in Melon Mambo with some Cheerful Treat DSP, which I ran through the Elegant Bouquet embossing folder.

I little bit of Concord Crush ribbon, some butterflys and a scallop oval sentiment using the Friendly Phrases stamp set - voila.

Monday, October 31, 2011

Christmas Treats

I am a fan of treats at Christmas. This is another class coming up, it is a set of Christmas Treats that are perfect for kids (or adults too). Many of these I have done each year (they are oldies but goodies - excuse the pun).

There is Snowman Soup, Reindeer Poop, Rudolph's Red Nose Repair Kit, a Reindeer Stick and a Gift Card Holder. Now you are probably thinking that Rudolph had a red nose - yes he does, but I didn't have any jaffas on hand, but don't worry I will have some for class.

The Snowman Soup has a hot chocolate sachet, marshmallows, candy cane and chocolate santa - to create a super special hot chocolate - not exactly a summer weather drink, but special enough to have anytime.


The gift card holder is made with a piece of cardstock cut at 4 1/8" by 11" (you can get two out of piece of cardstock). This is scored at 3", 5 1/2", and 8" and folded in a "W". I then used the word window punch and a circle punch for the gift card opening (but don't forget to close the other end).

Add some ribbon and some DSP and decorations to the outside and inside and you have a perfect gift card holder.

Monday, October 24, 2011

A Christmas in Gold

I have been busy preparing projects for the final couple of Christmas Classes (as well as swaps for Regionals!). I love gold at Christmas (it looks a little bit decadent) and this set was so easy to make with the Morning Mocha Speciality DSP.


The cards are 4" square and I used a base of Early Espresso, a Very Vanilla mat and the Mocha Morning Specialty DSP.


The images are from Welcome Christmas Stamp Set and little 'Merry Christmas' from the Petite Pairs Stamp Set. They were stamped in Versamark and then heat embossed with Gold Embossing Powder.


I also made a pizza box to store the cards in. The top of the box has the same mat and Mocha Morning DSP. I created a belly band out of Very Vanilla and added the image to the top section.

Wednesday, October 19, 2011

Framed In Colours


Well I finally got round to taking some photos of my In Colour version of the Frame from the previous post. I really love the bright colours, this will definately have to be a class next year(too busy with Christmas classes at the moment).


I originally had the background as plain white, but it just was lacking something so I added some of the First Edition Designer Series Paper.


The flowers are made with the Fun Flowers die, the 5 Petal Punch and the 1/2" Circle Punch.


I used the Patterned Designer Series Paper Packs from the In Colours 2010/11 and In Colours 2011/12 collections.

For those that were wondering which dot was missing - it was River Rock (can't believe I hadn't got round to getting some of the cardstock - I have now remedied that situation).

Thursday, October 13, 2011

Framed Neutrals

I have been inspired by the gorgeous colour flower display in the new Idea Book and Catalogue 2011/12 (page 2) and have been trying to work out how I can create something similar.

On the weekend I picked up some cheap white frames and came up with an idea. I used the Mocha Morning DSP for the background and used the Neutrals Colour group for my flowers.

Apologies for the reflection.

I used the Neutrals Collection Patterns Designer Series Paper Stack and the gorgeous new Fun Flowers Bigz L Die. I just used a 1/2" circle punch of cardstock for the centre of the flower. Btw - do you know which Neutrals colour I didn't have any cardstock of?

I've got another one to show you - as soon as I can take a photo in daylight!

Sunday, October 9, 2011

Clean and Simple Christmas with Punches

I have a stamp a stack coming up and wanted some simple and quick christmas cards, so I turned to our punches.

The ornament punch has been around over a year now and is fantastic. The Pennant Punch was launched in our New Idea Book & Catalogue and makes a great christmas tree. Finally, the new Stocking Building Punch makes the cutest little stockings.


All of the cards were made with the Letter from Santa DSP. I also embossed the top, heel and toe of the stocking with the Square Lattice Embossing Folder.

Note - I have heard from a few people that they were having trouble leaving comments on my blog, I have tried to change the settings, so hopefully its working now.

Thursday, September 29, 2011

I Love Tiny

I love Tiny - and tiny tags with the Mocha Morning DSP really hit the spot.

A lot of houses have a colour theme for their Christmas decorations - mine are gold, bronze, pearl and a touch of lime green, and whilst I have come to really like the Letters to Santa DSP, I love the metallic gold look of the Mocha Morning DSP.


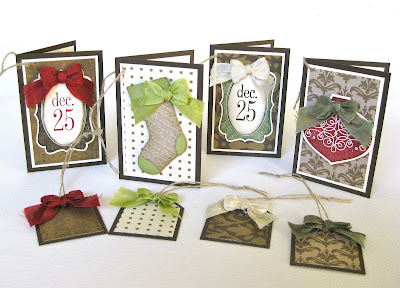
This set of 4 tiny cards and 4 tags where made with Early Espresso and Very Vanilla cardstock, Mocha Morning DSP, Tags til Christmas Stamp Set, Seam Binding and the new Stocking Punch (look out for more details of this great new punch in October).


The tags are all made from Early Espresso cardstock cut at 4 x 3" and scored at 2". A Very Vanilla mat and the Mocha Morning DSP.

I used the Decorative Label Punch, the Stocking Punch and the Ornament Punch. The cute little bows are made with the new Seam Binding.


Saturday, September 24, 2011

Simply Soft Set in new In Colours

I loved the Simply Soft Hostess set when I saw it in the new catalogue and the great thing about the new Hostess Benefits, is that you get to choose what you want to put your free dollars towards. You can choose one or more of the great Hostess sets (which are such great value) or anything else from the catalogue.


I used a Crumb Cake base card and stamped the outline image and sponged the edged in Whisper White Craft Ink.


For the image I stamped the outline in Staz On onto Whisper White cardstock, and then stamped the petals in Wisteria Wonder, Calypso Coral and Pool Party. The stems are just coloured in with an Old Olive marker.


I added some of the new In Colour ruffled ribbon.

The images were mounted onto Wisteria Wonder, Calypso Coral or Pool Party and added to the card base with dimensionals.


The box is made in a similar style to the cards and use some magnetic tape to close it.

Thursday, September 22, 2011

A Morning Mocha CASE

I came across this gorgeous card by Tessa Wise using the Flirtatious DSP (see here) and loved the simplicity of it.

I decided to create a similar one using the Morning Mocha DSP. I have also used some Soft Suede and Crumb Cake Patterned DSP to complement it. The tiny scallop border is made with the Dotted Scallop Ribbon Border Punch.


To create the 'flower', I punched squares from the DSP and rounded the corners on opposite sides. The top layer is popped up on dimensionals and the edges curled with my bone folder. I added a black button with the Linen Thread for the centre.


Sunday, September 18, 2011

I have been starting to get my Christmas Card Classes ready, and now that we have the new catalogue, I have lots of new goodies to play with.

I have seen these cards in a number of places, but I originally got the idea from Angie from Chic n Scratch (see here), and knew that I wanted to use the idea for some Christmas cards.


This set uses the new Letters from Santa DSP and the new Tags Til Christmas Stamp Set. I have used a 3 7/8" x 7 3/4" card (scored at 3 7/8") in Whisper White on top of the Early Espresso Scallop Square. The DSP is cut at 3 3/4" x 3 3/4".

I added some Old Olive Satin Ribbon or the wonderful new Cherry Cobbler Seam Binding (love this stuff).

Wednesday, September 14, 2011

A New Baby Gift

I needed a quick card and packaging for a friend who had just had a baby girl. I was inspired by Michelle Last (see her blog post here) I have had the Every Little Bit Stamp Set for a while, so it was good to finally get it out for a bit of a play.


I used a Crumb Cake base card and embossed it with the Perfect Polka Dot embossing folder. Then simply added the image mounted onto a scallop square punched from Pretty in Pink with a Pretty in Pink Satin Ribbon Bow and a Neutrals button. I also added the same image on the inside of the card and mounted some Whisper White onto some Pretty in Pink cardstock.

The package was wrapped in some kraft wrapping paper and I used some of the retired Nursery Suite Specialty DSP and a Pretty in Pink bow and matching Every Little Bit image from the card.

Wednesday, September 7, 2011

A new toy - Lace Ribbon Border

Recently I went away for a Stamp Camp with some lovely and talented fellow stampers - for us stampers this is heaven.

We all make a Shoe Box Swap for others to create - essentially cut everything for everyone to make one and put everything you need in a shoe box - voila. This one was mine.


I stuck some DSP (this was the retired Newsprint DSP) onto a Black Mat and ran it through the Square Lattice Embossing Folder for some texture. This was added to the front of a Very Vanilla base card.

I used the new Lace Ribbon Border punch to make the cool lace strip and topped it off with a Fancy Flower punched from Melon Mambo, a 5-Petal Flower punched from some more of the DSP and a 1/2" circle in black.

Simple

Monday, September 5, 2011

A Fathers Day Gift

My Dad is now 84 and unfortunately age has been starting to catch up with him. We are not sure if it is Alzheimers or Dementia but either way it's hard to see your dad change in the way this type of illness does. But one thing is for sure my dad is very easy to buy for at Father's Day, there are three things I get for him each year - Razors, Darrell Lea Licorice and Chocolate Ginger and he loves it.

Sunday was Father's Day in Australia so I collected my usual goodies but as I always do I left the packaging to the last minute - I love that putting together a co-ordinating package is so easy with Stampin' Up!


For the bag I grabbed a plain Kraft bag, added a strip of Always Artichoke which had an Early Espresso mat and stamped the leaf from the Lovely as a Tree Stamp Set in Versamark - simple.

I used the gorgeous tree from the same stamp set and coloured it with inks and a blender pen for the card, which was a similar design as the bag. The sentiment was simply the Modern Label punch in Early Espresso and the Word punch in Very Vanilla with the sentiment from the Teeny Tiny Sentiments Stamp Set, topped off with some Metallic Brads.


I bought some Newmans Chocolate Ginger by weight so I used a Medium Cello Bag to put them in, 'topped' off with a Top Note Die stamped again with the leaf in Versamark.

I added the same sentiment as the card but I used my Stamp-a-ma-jig to stamp it in 3 layers to fit the 1 1/4" circle punch which I had stamped with the same leaf stamp. I then layered it onto an Always Artichoke 1 3/8" circle and a scallop circle punched from Early Espresso. I made 2 of these and used the other one on the bag.

Familiarity is good for someone like my Dad so these gifts fit the bill perfectly and he couldn't wait to dig into his chocolates.

Thursday, September 1, 2011

New Catalogue Day

Well today is the day that the new 2011/2012 Idea Book & Catalogue by Stampin' Up! is available to customers - YEAH. I love this time of year and getting to pour over a new catalogue. There are some exiting new products available including stamps, dies and papers.

This is a gift set I made for one of my BFF's. She was turning the big "4 0". I had bought her a special Pandora charm so of course needed a gift bag to put it in. I used the new Beau Chateau DSP (which is beautiful) to make this gift bag and card set.


The bag was made with a kraft paper lunch bag (not SU) with a back (with flap) and front from Soft Suede Cardstock - you just need to cut to fit your bag size with a 1/8" overlap. I used a Very Vanilla mat and then used this beautiful Marina Mist DSP from the Beau Chateau DSP pack.

The flower on the front is made from a new die called Fun Flowers (this is going to be a favorite of mine) and the Five Petal Flower punch. I added a Very Vanilla button to the middle of the flower and attached it to the front flap by tying it on with Linen Thread.


The card is made in a similar fashion to the bag. I have added a border on the inside and outside using the new Lace Ribbon Border punch.

To create the 40 in the frame, I used another new product Designer Frames Embossing Folders in Very Vanilla cardstock and then adding more of the DSP to the centre.

All of the edges are lightly sponged in Soft Suede.


Tuesday, August 23, 2011

A Convention Case

Following on from my last post, these items are a case from the demonstration by Vanessa Webb (her website is here) at convention. Thanks Vanessa for the great ideas.

I was visiting one of my lovely stamping buddies (hi Margaret), who now has the most amazing craft room (I would like to move into it). Well she also happens to be a quilter and I got talking about wanting to use fabric on my cards, so she pulled out a drawer and said take a piece home - yeah, she is so sweet and generous.


The card has a base of Naturals Ivory with an embossed Cherry Cobbler mat. For the butterflies, I glued the fabric onto some Cherry Cobbler cardstock (I just used the anywhere glue stick). Then cut the butterflies using the Stampin' Up! Beautiful Butterflies Die. Using a bone folder I curled slightly the wings of the butterfly, unfortunately you can't see it to well in the photo but it gives the card a bit of 'height'. A few Pearl Basic Jewels finishes them off.


Now for the envelope I started the same way by glueing the fabric to the Cherry Cobbler cardstock, then die cut the Scallop Envelope. Then I ran the envelope through the Vintage Wallpaper embossing folder, and it gives this gorgeous embossed effect to the fabric.

The little card uses Naturals Ivory which I sponged the edges in Soft Suede and added some of the new Seam Binding ribbon to finish off.

Friday, August 19, 2011

A Fabric Flower

At Convention this year we had a great demonstration by Vanessa Webb about using fabric on cards, so when I got home I just had to try it out, unfortunately I didn't have much fabric at home so had to make do with what I had.

This card uses a brand new die called Fun Flowers that will be available from 1st September in the new Stampin' Up! Idea Book & Catalogue 2011/2012.


I wanted to make the flower sit up a bit so I glued the fabric to some copy paper then ran it through the die. I used 2 sets of the flowers and secured it to the card with a vintage brad. The card was also spritzed with Early Espresso.

I used Always Artichoke for the base card with a Cajun Craze mat and Naturals Ivory. The card is not quite the normal C6 size as I wanted it to fit the size of the Framed Tulips embossing folder (I embossed the cardstock first then worked out the rest of the sizes).

I had to add a couple of layers to the inside - this is actually serving a purpose (and not just to look pretty). You see with the flower it makes the front of the card very heavy and without the layers on the inside it would just fall over!!!