Showing posts with label 2015 Occasions Catalogue. Show all posts

Monday, April 6, 2015

Butterflies Thinlets & Painted Blooms

I have seen a number of these types of cards around on Pinterest and when I had a 4th Birthday party to go to today, this became the perfect opportunity to give it a try.

I went for a brighter look using Rose Red and some of the dotty Designer Series Paper from the Painted Blooms DSP.  I broke up the colour of the card with some white Seam Binding Ribbon and embossed the Happy Birthday from the Birthday Basics stamp set.


The bottom corners were rounded using the Project Life corner rounder by Stampin Up.  I also created a matching version in Pacific Point.


On the inside of the card I added some small butterflies punched using the Small Butterfly Punch.


After I had wrapped the presents, I added Butterflies die cut from Rose Red cardstock on each of the presents and the envelope.


The birthday girl loved them.


Built for Free Using: My Stampin Blog

Wednesday, March 25, 2015

Another Fun Bokeh

Another card I made from the Shoebox Swaps was this one from Philippa (my very talented downline).  This Bokeh card uses bright fun colours of - Coastal Cabana, Real Red and Daffodil Delight.


The sentiment is from the Big on You stamp set which has been combined with the 'celebrate' from the Celebrate Today stamp set.

Saturday, March 14, 2015

A Matching Vintage Screen Divider Card

I had an opportunity to get away with some talented stamping friends.  It is always a great time of creating, laughing, and eating.

My friends wanted to make a screen divider card and used my Vintage Painted Petals card for inspiration.  This card was designed by Philippa and the one below was created by Margaret. 


 I think the end result is absolutely stunning.  Thank you ladies for letting me show your card.

Wednesday, March 11, 2015

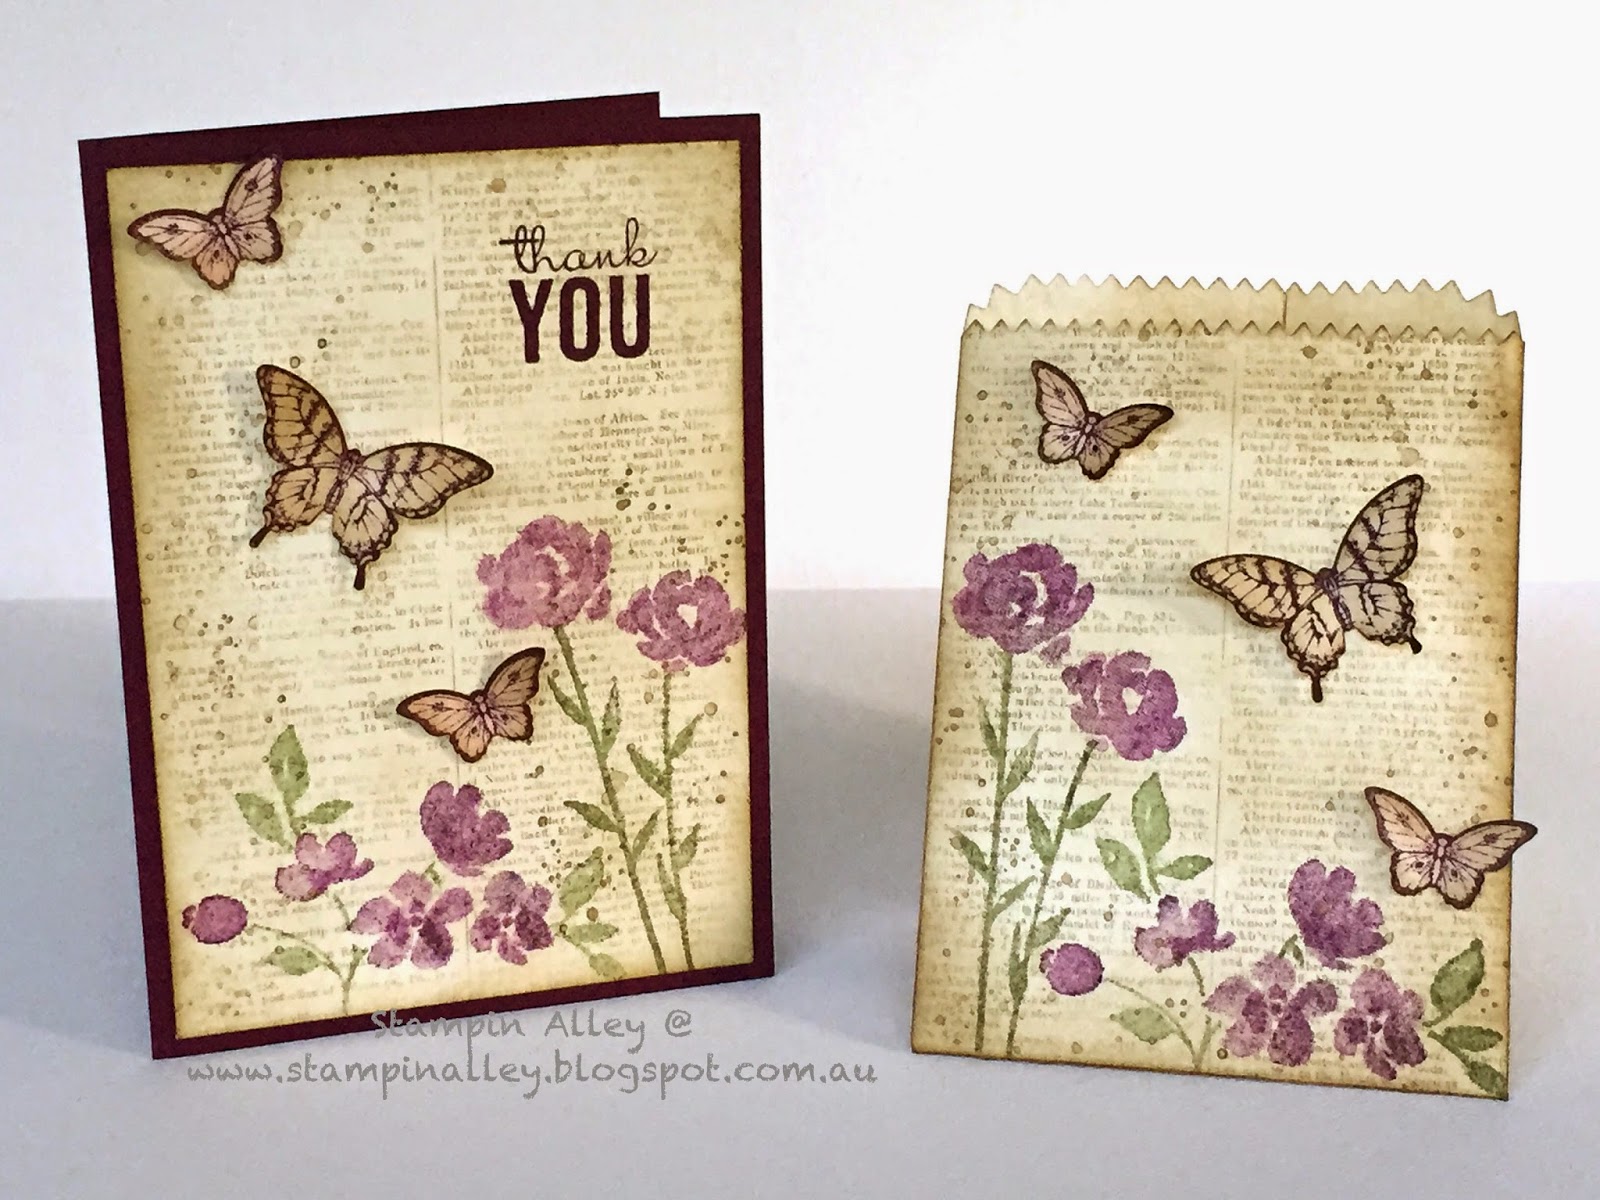
Vintage Painted Petals

I am loving the vintage look at the moment and have been dying to use the new Stampin Up Painted Petals stamp set.


I started by sponging the Stampin Up Dictionary Background Stamp in Soft Suede and stamping on Very Vanilla.  I stamped the leaves in Mossy Meadow after stamping off once first to give a muted effect.  I then stamped the flowers using the same technique in Blackberry Bliss.  I then sponged the card and stamped the scattered dots from the Gorgeous Grunge stamp set.


I added a couple (well actually 3) butterflies from the Papillion Potpourri stamp set and punched out using the matching punches to give a bit of dimension to the card.

Of course I got on a roll so decided to make a matching Mini Treat Bag to match it.


Built for Free Using: My Stampin Blog

Tuesday, March 3, 2015

A Vintage Indescribable Postcard

This is the second card I created using the Indescribable Gift stamp set.  I wanted to create a vintage look and love Stampin Up's Postcard stamp and they worked perfectly together.

I sponged the entire Very Vanilla piece in Soft Suede to create a 'grubby' and worn effect, along with the Blushing Bride card base.


I like to decorate the inside of my cards to match, so I added a section of the stamp with the buds to the inside of the card and sponged it to match the front.


I decided to create my own envelope for this card and used the Envelope Punch Board.  Of course what else could I do but decorate it to match the card.


Built for Free Using: My Stampin Blog

Saturday, February 28, 2015

Pastel Indescribable Gift

If you are into colouring images, the Indescribable Gift Stamp Set is perfect to team with Stampin Up's Blendabilities.  This is the first of a couple of cards I created with this stamp set.


Stampin Up have released some beautiful colours from the Subtles colour family in the new Occasions Catalogue - Pink Pirouette, Wild Wasabi and Soft Sky.  They create a beautiful soft effect.  To add more depth to the image I outlined it in the lightest Soft Sky marker.


Blendabilities are so versatile, you can colour anything with them.  I coloured the pearls in the darkest Soft Sky colour.


Built for Free Using: My Stampin Blog

Wednesday, February 25, 2015

A Bokeh Tag Card

Here is another card using the Bokeh Technique.

I was on a bit of a roll with Bokeh Technique so created a tag using Night of Navy, Coastal Cabana, and Pistachio Pudding.  I teamed this with Night of Navy Cardstock and Seam Binding and the Polka Dot Embossing Folder - it's circles galore!


Built for Free Using: My Stampin Blog

Monday, February 23, 2015

Typeset & Something Lacy Butterfly

I am loving the Butterflies Thinlets Dies.

I went with a more rustic look with this card, using the Something Lacy background stamp and the Typeset Specialty Designer Series Paper


To create the Butterflies, I diecut them in Basic Black and then stuck them down to a piece of the Typeset DSP, then using my Paper Snips I trimmed the excess paper away.


Built for Free Using: My Stampin Blog

Tuesday, February 10, 2015

Birthday Treat Bag

This is the last project from my Celebrate Today class, which consisted of 4 projects all using the Celebrate Today stamp set and the Balloon Framelits, you can see the other projects here, here and here!


This Treat Bag was made using the Mini Treat Bag Thinlets Dies and the Back to Black Designer Series Paper.  I wanted to add a pop of colour so stamped the balloon (with the Happy already on it) in Melon Mambo ink and added the 'birthday'.  Simple


Built for Free Using: My Stampin Blog

Sunday, February 8, 2015

Irresistibly Yours Birthday

I have had so much fun with the Celebrate Today stamp set and the Balloon Framelits.  This was another card, which was so quick and simple to make using the Irresistibly Yours Speciality Designer Series Paper (available only through Sale-A-Bration).


I simply stamped the solid Balloon stamp directly onto the Irresistibly Yours paper in Blackberry Bliss, Hello Honey and Tangelo Twist and cut them out using the Balloon Framelits.  I added the streamers and a sentiment using the Itty Bitty Banner stamps and dies - simple.


I always like to fancy up the inside of my cards and added another balloon to the corner.


Click on the links below to go to my Stampin Up store.


Built for Free Using: My Stampin Blog

Wednesday, February 4, 2015

A Chalkboard Birthday

Stampin Up have now released Chalkboard Paper which is very cool, where one side has a smooth surface (just like a blackboard) and the other side is like the standard cardstock.  I have used the Rose Coral ColorBox Chalk Ink (also now available from Stampin Up) to stamp the sentiment from the Birthday Surprise stamp set.  I wanted to give the balloons a more rustic look to go with the chalkboard, so I sponged the edges in Soft Suede and stamped the spots from the Celebrate Today stamp set in Versamark to give a subtle tone on tone look.


The colours used are Soft Suede, Whisper White, and Blushing Bride.  

If you wish to purchase any of the items used in the project just click on any of the links below to take you to my Stampin Up store.

Built for Free Using: My Stampin Blog

Saturday, January 31, 2015

Lotus Blossom from SAB

I loved the Lotus Blossom set in the Sale-A-Bration catalogue as soon as I saw it, so my class ladies got to create this little set of Notecards at class (there is actually 4 cards, but for some reason I missed putting the blue one up).

The Lotus Blossom Stamp Set is actually a three step stamping set and comes in photopolymer so that you can see exactly where you are positioning the stamp when adding the layers.  By the way did you know that you actually don't need 2 or 3 different colours to get the variated colours.   I find with the new stamp pads from Stampin Up that you can get beautiful variations of the one colour just by stamping off 1, 2 or even 3 times.  To create the effect for the cards below I simply stamped the smallest stamp in full strength ink, then the middle stamp after stamping off the stamp once, and the largest stamp by stamping off the stamp twice.

You can't tell from the picture by the sentiment is embossed with gold embossing powder and is from Butterfly Basics set from the new Occasions Catalogue.


Here is a great video from Stampin Up showing this great new set.


Built for Free Using: My Stampin Blog

Thursday, January 29, 2015

Bokeh Technique with a Butterfly

The Bokeh Technique is all the rage at the moment and I have been wanting to give it a try.  It creates beautiful coloured backgrounds with white spots representing light reflections - this is often achieved by photographers.  Apologies for my vague description.

I created a couple of cards and will show the other one in another card next week.  With this card I was looking for a soft pastel background and used Pool Party, Wisteria Wonder and a touch of Marina Mist reinkers.


In essence I brushed a piece of watercolour paper with water, then after mixing some reinker and water added this in splotches all over the paper.  I used an Aqua Brush to allow me to water down the ink and keep the watercolour paper moist.  Once I was happy with it, I used a heat gun to completely dry the watercolour paper and then added circles using a template I created with some clear acetate with circles cut out in various sizes using the Circles Framelits and a sponge dauber.   The picture below shows the circles a bit better.


There are lots of tutorials on Youtube if you are looking for full details of how to create.


Built for Free Using: My Stampin Blog

Monday, January 26, 2015

Sorry I have been gone so long

Hi all, I know you are probably wondering where I have been - I will share some details but first let me show you the first of many projects that I have been creating.

I went with a bright and and funky card that would be perfect for kids of any age (as well as adults), using the Celebrate Toady Stamp Set and the Balloon Framelits Dies.  I love this stamp set and die, and you will see more cards using these later this week.


This card has a Whisper White card base which I layered with the Pacific Point dot DSP from the Brights Designer Series Paper Stack, and used the Sweet Taffy DSP behind the cut out balloons.  I wanted a smaller balloon so I used the Circles Dies and used the top of the Streamers from the Balloons Die Set to cut the 'tail' of the balloon and added some co-ordinating Bakers Twine and voila.  There are links below to some of the products used.


I must apologise for being gone for so long.  Unfortunately restructuring at work left us under resourced and 'highly stressed'!!!  In addition my father has dementia and unfortunately has deteriorated significantly over the last few years, last year needing full time nursing care.  All I can say is it is a horrible illness, I have slowly lost the father I knew (even though he is still with us), and watched my mother struggle as she saw the deterioration of the husband she had shared her life with for almost 50 years.

As a result I struggled to keep my Stampin Up going, even taking a break from classes for 6 months last year (sorry ladies), but I made a decision this year to reduce to work only 4 days a week, allowing me more time to spend with my parents and renew my love of creating.  And finally I have found some balance!