Showing posts with label Big Shot. Show all posts

Saturday, June 26, 2010

Birthday Card for a Boy

One of my best friends kids had birthdays so I needed a birthday card for a 6 year old boy. You know that stage where they are not really into cute anymore. The Lots of Bots stamp set is perfect for this age group.


I used the simple 'spotlight' technique (I think that is what it is called), by stamping 3 robots in black, then colouring another one with markers and a blender pen, punching out using a circle punch and adding it to the card with dimensionals.

On the inside a added a Tempting Turquoise border to some Whisper White cardstock and stamped the image again with the cute sentiment "Happy Birthday Human".

I also did a pillow box which will house a freddo frog (kids and chocolate).


Thursday, May 6, 2010

A Bird Card (that didn't make the grade)

This is one of the cards that didn't quite make the grade as a swap for convention. It just didn't quite have enough 'something'.

I used the same technique for the background and bird as the border of the Easel card - versamark and Stampin' pastels. The branch is from the Autumn-Winter Mini Catalogue (I just trimmed one of the branches so the birds would fit).

Yeah the weekend is almost here.

Wednesday, April 21, 2010

Interlocking Card

Here is another creation from from the online class I did with Heather Summers (see here for details). It's called an interlocking card.


I used Kraft, Vanilla and Rich Razzleberry cardstock. The Kraft cardstock and the bird has been stamped with the flowers from the Vintage Vogue Stamp Set. I used the Polka Dot Embossing Folder for the centre mat.


The trickiest part of doing these cards is making sure the squares all fit together.


Monday, April 19, 2010

Mother's Day Card

I was playing with the flowers I had made here and decided to try them in vellum. I liked the way it turned out so decided to use it for a Mother's Day card. (Apologies for the photo quality, it was taken late in the day.)


I sponged the edges of the vellum scallop circles with Rich Razzleberry. I added the flower to a Top Note cut using the Big Shot from Whisper White cardstock and embossed using the polka dot embossing folder on the lower half.

I can't believe I actually have my Mother's Day card made well before Mother's Day.

On another note, I had so much fun this afternoon catching up with my card making buddy - thanks Debbie, check out her gorgeous work here.

Sunday, April 11, 2010

Mini Catalogue Open House Event

I had an Open House this Saturday for the new Autumn-Winter Mini Catalogue. Thank you to all the lovely ladies that came to enjoy demonstrations and make & takes with all the new products.


This was one of the make & take's. I think I am going to like this Robot dude, he is perfect for kids and male cards. I added some nuts on the inside to tie it all together. The nuts on the Kraft card is stamped with versamark. I love this colour combination for male cards.


This was another of the make & takes - a matching 3 x 3 card and pillow box.

The other make & take was the medallion card (from a previous post).


These were the packets of ribbon I made for my share packs, they used so many of the new products - Big Shot, Polka Dot Embossing Folder, Top Note Die, the Bird Punch, along with the new cardstock colours and DSP.


Hope you have had a lovely weekend.


Monday, March 29, 2010

Polka Dot Vellum

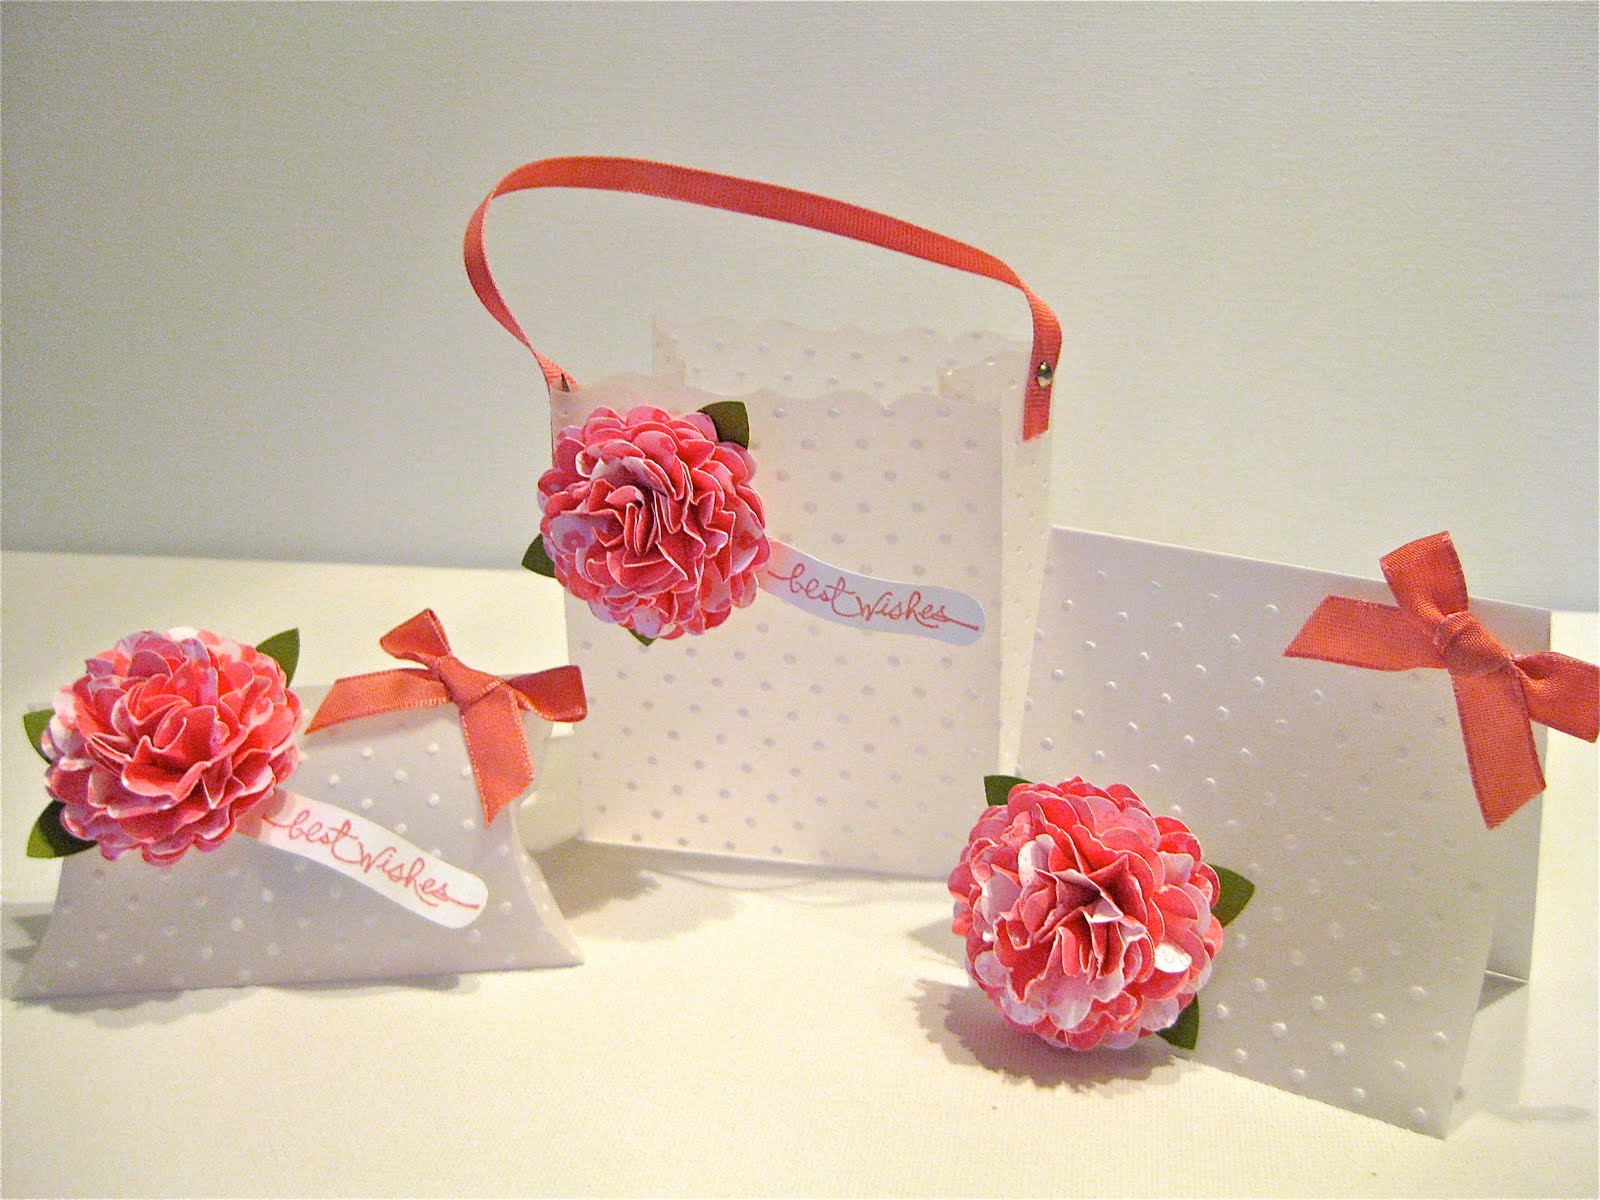
I am having so much fun with my new polka dot embossing folder and my Big Shot. The Embossing Folders that you can get from Stampin' Up! are slightly bigger than the Cuttlebug ones, so fit nicely on a card front. I was playing around with some different papers and loved the effect that it give to vellum, so I created this set.


The set consists of a Fancy Favor Box (I never know whether it is a Box or a Bag), a Pillow Box and a 3 x 3 card.

I have seen these flowers on a number of blogs including and when I came across a YouTube tutorial by Dawn (see here), I had to give them a try.


These flowers were made with the Regal Rose sheets from the Patterns Pack II Designer Series Paper (a level 1 Hostess Set). You can get 2 flowers out of 2 6x6 sheets.

I didn't have any Regal Rose ribbon, so I used my marker to colour my Whisper White Grosgrain and Taffeta Ribbon. Tip: make sure the ribbon is dry before attaching with mini glue dots - they don't stick very well when they are still wet.


I used the 5 Petal Flower Punch for the leaves and the Short & Sweet Stamp Set.

For the card I just put the sentiment on the inside.

I love short work weeks, but I am seriously going to have to detox from Chocolate come next Monday!!!


Tuesday, March 23, 2010

Caseing the New Catalogue

This card is CASE'd from the New Autumn-Winter Mini Catalogue from Stampin' Up! I loved the combination of the Polka Dots Embossing Folder, Top Note Die and the Bird Punch. Apologies for the quality of the photo, it was a bit late in the day.


I also made a Pillow Box to match the card, the Pillow Box is a Die available to use with the Big Shot Machine (both available from 1st April). The Card and Pillow Box are made with one of the 3 new colours also being released on 1st April by Stampin' Up! along with matching ribbons.

Hope you are having a good week.

Sunday, March 21, 2010

Another Birdie Sneak Peek

I am loving this new Birdie Punch (due out 1st April). I made a little 3" x 3" thank you card with the Bird Punch and the new Polka Dots Embossing Folder (also due out 1st April). I also added some dots to the bottom of the inside mat. So quick and simple.

Tuesday, March 16, 2010

Another Sneak Peek

Here is another peek at a new stamp set that will be coming out in the new mini catalogue on the 1st April. I have also used the new Fancy Favor die by Stampin' Up.


Tip - you don't have to just use 12 x 12 cardstock for the Fancy Favor box, it will fit the A4 cardstock (just).

I have also used one of the new colours - I love this colour and it also comes in an ink pad and matching ribbon.

I have stamped each of the flowers 3 times, to get 3 different tones of the same colour (yes the flowers were all from the same colour ink pad).

For the ribbon, I have 'rouched' it - simply by adding adhesive to the box and then folding the ribbon over on itself as I applied it.

Edit: I have been asked for the dimensions of the box. It is 3 1/2" (8.8cm) tall, 3 1/8" (7.8cm) wide and 2 1/4" (5.6cm) deep.

Sunday, March 14, 2010

A Little Birdie Set

I love this new Birdie punch. I wanted to make a really quick and simple card set using this little Birdie. This is the box I made to house the little cards and envelopes.


Tucked inside the box are 4 little cards, these cards are only 2" x 3" (cardstock cut at 4" x 3" and scored at 2"). I punched the little Birdie in Baja Breeze and Riding Hood Red with the wings punched from the Sweet Slumber Specialty DSP. The branches were punched from Chocolate Chip cardstock. Did you notice the sentiments???? They are from the new Teeny Tiny Sentiments stamp set (available in the new mini from 1st April).


The envelopes were cut with the Scallop Envelope Die using the Big Shot Machine - oh so easy peasy.

Hope you have had a good weekend.


Saturday, March 13, 2010

Little Birdie

Little Birdie sitting in a tree.

This is another sneak peek at a new punch that is coming in the new mini catalogue available from 1st April. As soon as I saw it I had to have it - it is sooo cute.


This is a very simple way to use this little birdie. I have teamed the little birdie with the Fancy Favor Box. One punch punches all three pieces - the branch, the bird and the wing, but you can punch out each part in whatever colour or paper you like. Here I have punched the branch in Old Olive cardstock and the bird in Baja Breeze which has been sponged around the edge in Tempting Turquoise. I also sponged the edges of the box to give some dimension to it.

Did you notice the new ribbon, it is in one of the 3 new colours (yep I did say new colours).

I have another little set using this bird punch, which I will show you later.

Thursday, March 11, 2010

Chick A Dees

Well I did say that I would show you what I came up with for those little Chick-A-Dees I created a few days ago and here they are. I liked how they turned out. As advised in my earlier post, the chicks were inspired by the talented Andrea Walford (see her card and post here).


Okay let me just say - I am in love with the new products from Stampin' Up! that will be launched on the 1st April in the new Autumn-Winter Mini Catalogue. Here is a sneak peak of the Fancy Favor Box which uses the Big Shot Die Cutting Machine (I have been hanging out to get my hands on this machine).

You can only just see in these photos that the chicks have some Dazzling Diamonds along the edge of their egg - he he I think its kinda cute.


I have cut the Fancy Favor box out of the Kaleidoscope DSP (I think it has the perfect colours for Easter). I used the 1 3/4" punch and some acetate to create a window in the front.

Now if you cut out the Fancy Favor box don't throw out the left over paper after the box is cut, it gives a really cute edge that is just perfect to use on cards.


I didn't have any blue ribbon, so I took some white grosgrain ribbon and coloured it with my Baja Breeze stamp pad and my Tempting Turquoise marker.

Hope you like and I will be back soon with more sneak peeks.