Monday, March 29, 2010

Polka Dot Vellum

I am having so much fun with my new polka dot embossing folder and my Big Shot. The Embossing Folders that you can get from Stampin' Up! are slightly bigger than the Cuttlebug ones, so fit nicely on a card front. I was playing around with some different papers and loved the effect that it give to vellum, so I created this set.


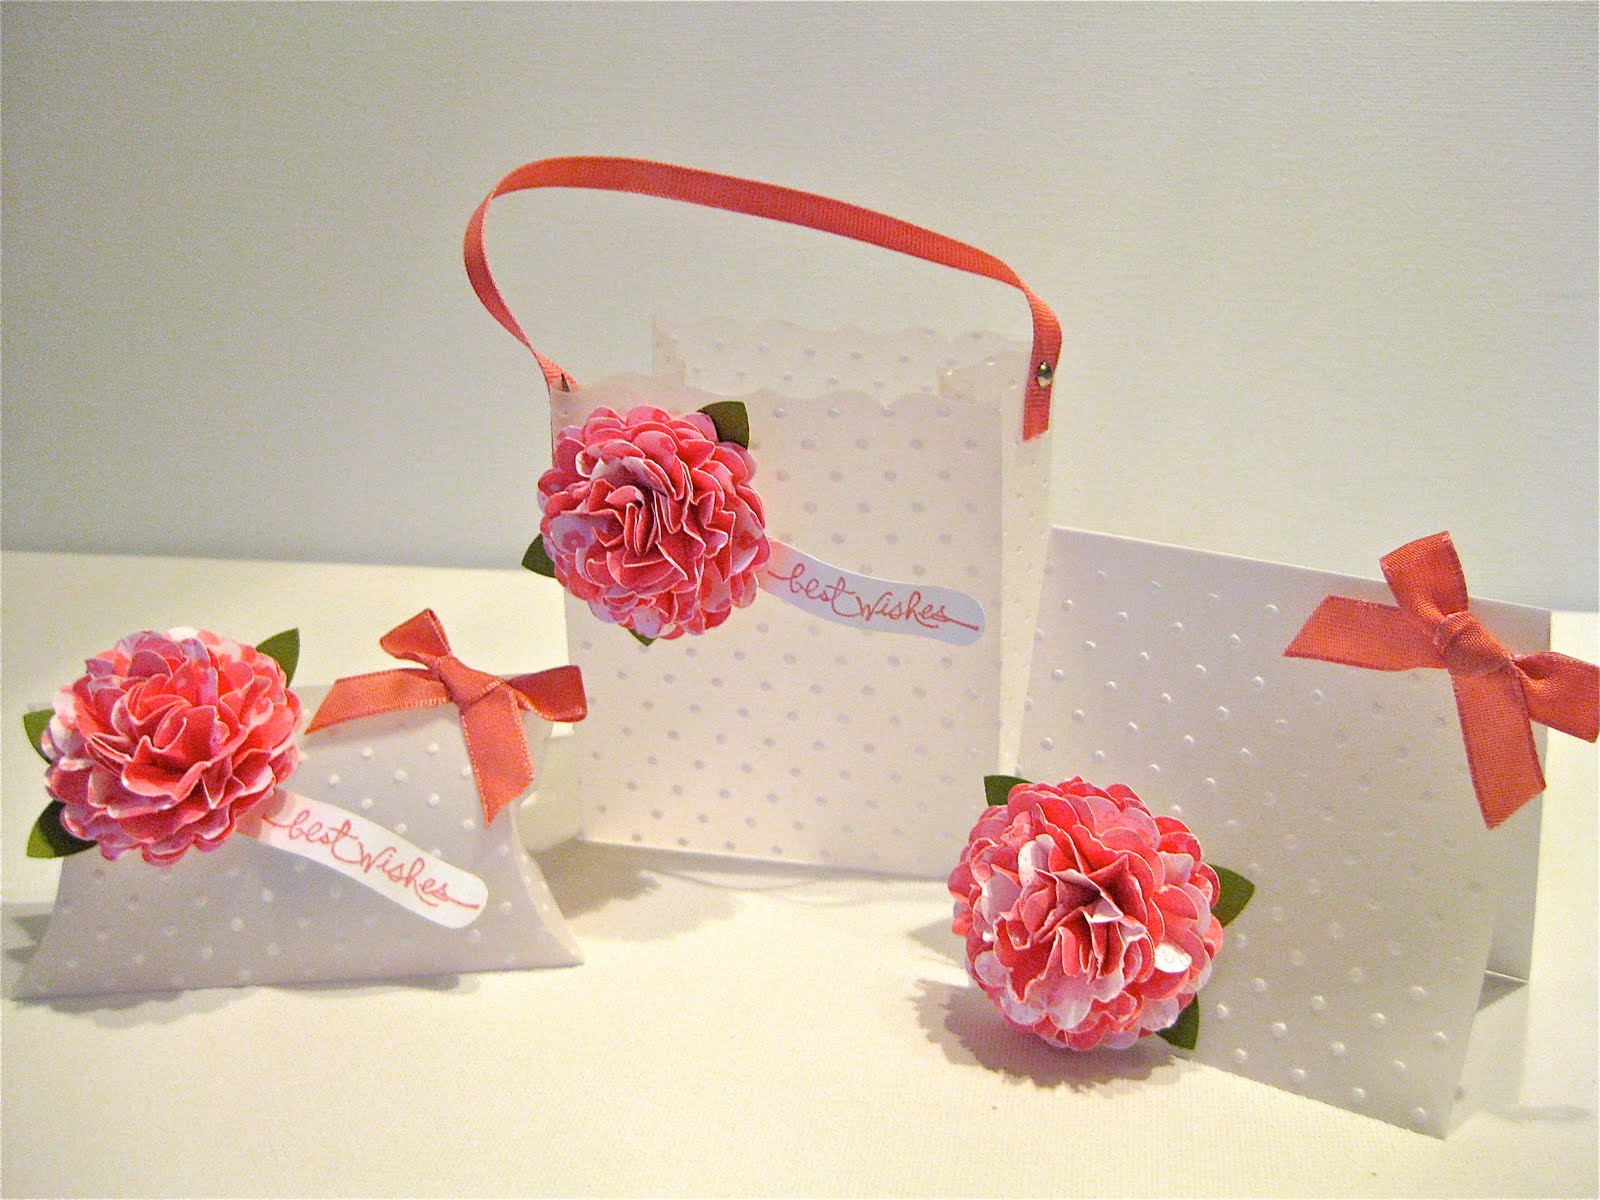
The set consists of a Fancy Favor Box (I never know whether it is a Box or a Bag), a Pillow Box and a 3 x 3 card.

I have seen these flowers on a number of blogs including and when I came across a YouTube tutorial by Dawn (see here), I had to give them a try.


These flowers were made with the Regal Rose sheets from the Patterns Pack II Designer Series Paper (a level 1 Hostess Set). You can get 2 flowers out of 2 6x6 sheets.

I didn't have any Regal Rose ribbon, so I used my marker to colour my Whisper White Grosgrain and Taffeta Ribbon. Tip: make sure the ribbon is dry before attaching with mini glue dots - they don't stick very well when they are still wet.


I used the 5 Petal Flower Punch for the leaves and the Short & Sweet Stamp Set.

For the card I just put the sentiment on the inside.

I love short work weeks, but I am seriously going to have to detox from Chocolate come next Monday!!!


Wednesday, March 24, 2010

Medallion Stamp

Okay I thought I had better give you something other than the new Bird Punch, as there are lots of other fantastic products coming in the new mini catalogue. This set is using the new Medallion Stamp and for anyone who loves simple cards, this stamp is perfect.


For the first card I stamped the Medallion stamp in Rich Razzleberry on Whisper White Cardstock and matted it onto some Rich Razzleberry Cardstock. I added a sentiment from Sincere Salutations, some Chocolate Chip Grosgrain ribbon and to top it off some Rhinestone bling.

On the inside, I added another piece of Whisper White cardstock and stamped off a small edge of the Medallion stamp in the bottom corner.


For the other card I decided to give it a bit of dimension with a two tone effect. I have used the new colour - Rich Razzleberry and added some Chocolate Chip to the edges of the stamp prior to stamping on the Whisper White cardstock.


I have wanted to try using my stamps on candles since seeing this done at Regionals by the talented Sue Madex.

My candle was a little small, so was a little difficult to handle, but I think it still turned out pretty well for my first go. This technique is so easy and has so much potential.


Tuesday, March 23, 2010

Caseing the New Catalogue

This card is CASE'd from the New Autumn-Winter Mini Catalogue from Stampin' Up! I loved the combination of the Polka Dots Embossing Folder, Top Note Die and the Bird Punch. Apologies for the quality of the photo, it was a bit late in the day.


I also made a Pillow Box to match the card, the Pillow Box is a Die available to use with the Big Shot Machine (both available from 1st April). The Card and Pillow Box are made with one of the 3 new colours also being released on 1st April by Stampin' Up! along with matching ribbons.

Hope you are having a good week.

Sunday, March 21, 2010

Another Birdie Sneak Peek

I am loving this new Birdie Punch (due out 1st April). I made a little 3" x 3" thank you card with the Bird Punch and the new Polka Dots Embossing Folder (also due out 1st April). I also added some dots to the bottom of the inside mat. So quick and simple.

Tuesday, March 16, 2010

Another Sneak Peek

Here is another peek at a new stamp set that will be coming out in the new mini catalogue on the 1st April. I have also used the new Fancy Favor die by Stampin' Up.


Tip - you don't have to just use 12 x 12 cardstock for the Fancy Favor box, it will fit the A4 cardstock (just).

I have also used one of the new colours - I love this colour and it also comes in an ink pad and matching ribbon.

I have stamped each of the flowers 3 times, to get 3 different tones of the same colour (yes the flowers were all from the same colour ink pad).

For the ribbon, I have 'rouched' it - simply by adding adhesive to the box and then folding the ribbon over on itself as I applied it.

Edit: I have been asked for the dimensions of the box. It is 3 1/2" (8.8cm) tall, 3 1/8" (7.8cm) wide and 2 1/4" (5.6cm) deep.

Sunday, March 14, 2010

A Little Birdie Set

I love this new Birdie punch. I wanted to make a really quick and simple card set using this little Birdie. This is the box I made to house the little cards and envelopes.


Tucked inside the box are 4 little cards, these cards are only 2" x 3" (cardstock cut at 4" x 3" and scored at 2"). I punched the little Birdie in Baja Breeze and Riding Hood Red with the wings punched from the Sweet Slumber Specialty DSP. The branches were punched from Chocolate Chip cardstock. Did you notice the sentiments???? They are from the new Teeny Tiny Sentiments stamp set (available in the new mini from 1st April).


The envelopes were cut with the Scallop Envelope Die using the Big Shot Machine - oh so easy peasy.

Hope you have had a good weekend.


Just Add Ink - Challenge #8

I made another Easter Bag and card with the left over Chick-A-Dees that I had made and thought I would enter it into the Just Add Ink Challenge, the theme this week is Easter - so perfect (and thanks to Liam for encouraging me to enter). As mentioned I got the inspiration for the Chicks from Andrea Walford (see here), but wanted to make something different with them and I just love this new Fancy Favor Die available from 1st April.

I'll be back soon with more sneak peeks.


Saturday, March 13, 2010

Little Birdie

Little Birdie sitting in a tree.

This is another sneak peek at a new punch that is coming in the new mini catalogue available from 1st April. As soon as I saw it I had to have it - it is sooo cute.


This is a very simple way to use this little birdie. I have teamed the little birdie with the Fancy Favor Box. One punch punches all three pieces - the branch, the bird and the wing, but you can punch out each part in whatever colour or paper you like. Here I have punched the branch in Old Olive cardstock and the bird in Baja Breeze which has been sponged around the edge in Tempting Turquoise. I also sponged the edges of the box to give some dimension to it.

Did you notice the new ribbon, it is in one of the 3 new colours (yep I did say new colours).

I have another little set using this bird punch, which I will show you later.

Thursday, March 11, 2010

Chick A Dees

Well I did say that I would show you what I came up with for those little Chick-A-Dees I created a few days ago and here they are. I liked how they turned out. As advised in my earlier post, the chicks were inspired by the talented Andrea Walford (see her card and post here).


Okay let me just say - I am in love with the new products from Stampin' Up! that will be launched on the 1st April in the new Autumn-Winter Mini Catalogue. Here is a sneak peak of the Fancy Favor Box which uses the Big Shot Die Cutting Machine (I have been hanging out to get my hands on this machine).

You can only just see in these photos that the chicks have some Dazzling Diamonds along the edge of their egg - he he I think its kinda cute.


I have cut the Fancy Favor box out of the Kaleidoscope DSP (I think it has the perfect colours for Easter). I used the 1 3/4" punch and some acetate to create a window in the front.

Now if you cut out the Fancy Favor box don't throw out the left over paper after the box is cut, it gives a really cute edge that is just perfect to use on cards.


I didn't have any blue ribbon, so I took some white grosgrain ribbon and coloured it with my Baja Breeze stamp pad and my Tempting Turquoise marker.

Hope you like and I will be back soon with more sneak peeks.


Wednesday, March 10, 2010

Lots of Scraps

Do you have a box full of scrap DSP - my box is starting to get very full, so I decided after seeing this post by Becky Roberts (see here) that I needed to start using up my scraps and her design would be perfect to case. All materials used Stampin' Up! unless otherwise stated.


The design on the left uses scraps from the Urban Garden Designer Series Paper, while the one on the right uses scraps from the now retired Walk in the Park Designer Series Paper.

All scraps are approx 1 inch wide and 4 inches long. I used another piece of Whisper White cardstock that I had punched the eyelet border along one edge. Add some ribbon and a sentiment and voila a quick and simple card, and a few less scraps in that scrap box!!!

To follow through the design to the inside of the card I used a small strip of the scraps at the bottom.

I am on annual leave this week and having so much fun creating, I'm loving it.

Tuesday, March 9, 2010

Good Neighbours Set

I got this Sale-A-Bration set a little while ago, but have been struggling to know what to do with it. I decided to come up with a little gift box and card set that I could use for house warmings, and this is what I came up with.


All the pieces in the Stamp Set - the trees, houses, roofs and clouds are separate so can be mixed and matched in whatever combination takes your fancy.

This little box is the 2.5 inch box that I have done many times before (very versatile). I stamped houses on each of the four sides. The brown lid looked a little plain, even with the scalloped edges so I sponged the top edges and added the Old Olive grosgrain ribbon.

Of course since doing this, I have found lots of inspiration on the web for this set, so may be back with more.

I was soo excited to have 3 (yes that's right 3) Stampin Up boxes arrive at my door this morning - YEAH. It is my pre-order for the next mini catalogue which is due out on 1st April. I can't show you what is in the boxes but I will be giving you some sneak peaks over the next few weeks. I can't wait to play.


Stay tuned.

Monday, March 8, 2010

Easter is coming

I just recently got A Good Egg stamp set, and with Easter round the corner I have been itching to use it. All supplies Stampin' Up! unless otherwise stated.


The tutorial for this basket I found on Splitcoast Stampers (it's designed by Makeesha).

I made the box in Chocolate Chip Cardstock and used the new Kaleidoscope Designer Series Paper to decorate it. The chick is coloured with blender pens (in Baja Breeze and Apricot Appeal) with Only Orange directly for the beak.

I haven't filled it with eggs yet (to dangerous to get them now - as I would just eat them before giving them away).


This second box was made up - well I actually had the base already made (a failed attempt from another project), so just needed to make a lid. Tip - I always add 1/8th inch to allow the lid to slip on more easily.

I decorated it in a similar way to the basket and used the Regal Rose ribbon. I will fill this one with little eggs (when the time is right!!!).


I really loved these chicks done by Andrea Walford (see here), so ended up making them in Barely Banana (with Pumpkin Pie), Pretty in Pink (with Pink Passion), Bashful Blue (with Tempting Turquoise) and Certainly Celery (with Kiwi Kiss). I used flowers using the Boho Blossoms punch for the girly ones, and buttons for the ones I'll use for boys.


I'll show you later in the week how I use them.

Melbourne is having some very weird weather the last couple of days - with so much rain that the city flooded, and hail stones that were as big (or bigger) than golf balls, it's very strange when one minute it is 'bucketing down' and the next the sun is out - go figure! Thankfully no damage here but unfortunately others have not been so lucky. So to everyone - stay safe.