Saturday, December 18, 2010

A Merry Christmas Matchbox

Another idea for a Christmas Table treat is a little Christmas Matchbox.


I used the Square Lattice Embossing Folder to give some texture to the Matchbox cover. The label comes from the Lots of Tags die with my favorite 'Merry Christmas' stamp (from the Contempo Christmas stamp set) and a little button.

The Hershey chocolates were covered in Jolly Holiday DSP. I went to Costco to get the Hershey Chocolates, the problem is that Costco is a bulk store, so they only sell them in 1.5 kg bag - I do still have a few left!!!

Friday, December 17, 2010

A Sparkly & Bright Make & Take

What do you do when you have 1 hour to come up with a make and take (nothing like leaving things to the last minute) - CASE a talented lady. I really liked these cards created by Marelle Taylor, so I changed it up a little by adding a Whisper White cardstock with a Scallop Trim Border. I also made a little Sunny Boy treat holder and voila, I had 2 quick and simple make and take projects all prepared and 1 hour, and I just made it before the girls all arrived - PHEW.


I had lots of different paper prepared, with a Cherry Cobbler or Old Olive card base, so the girls could choose what combination they liked.

I only recently bought the Sparkly & Bright Stamp Set and was so glad that I did.


The Sunny Boy containers are a great idea for Christmas table favours. They are great to put some little chocolate balls in for a sweet treat.

Thursday, December 16, 2010

My Retro Christmas Tree Card

I think I was just in a bit of a funky, retro mood when I created this card. I had seen punched newspaper print used on some other cards to create a background and thought why not make a Christmas Tree.

I used Naturals Ivory Cardstock, the Newsprint DSP and the Ornament Punch - how simple is that. I sponged all the edges of the card and the ornaments in Soft Suede, then added a sparkly 'star' (which is from the Boho Blossom Punch) and Noel from the Many Merry Message Stamp Set.


On the inside I added another ornament and the Merry Christmas from the Contempo Christmas (love that stamp).

I took a whole stack of cards into work and this was the most popular one - go figure, I liked it too, but thought it may have been a bit to funky/retro for others.

Wednesday, December 15, 2010

A little bit of Joy

Isn't it annoying when photos really don't do something justice - the red background on this card actually sparkles like there is no tomorrow, but unfortunately you just can't see it in the photo : (

This card came together pretty quickly. I had done a lot of cutting out images recently and just couldn't bring myself to cut out the JOY from the Welcome Christmas stamp set, but I wanted to show it off a bit more. Now none of the label dies or punches I had would fit the image, so I created my own. Can you guess what I used?


This photo will probably help you out, need another hint it - you need three of them to create it.

I used the Square Lattice Embossing Folder on the Real Red background and then sprayed it with my Champagne Mist (Champagne Shimmer Paint and Isocol) - I really did spray it!


Sunday, December 12, 2010

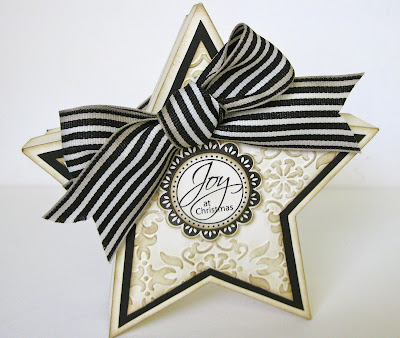
A Vintage Star

I was so inspired by the very talented Paula when she posted her gorgeous Star Box (see her stunning creation here), I just had to create one myself. The template is from Lauren Meader and is so perfect for Christmas.


I added the Christmas stamp from the Perfect Punches Stamp Set and some striped grosgrain ribbon.

I decided to vintage mine up a bit more and sponged all the edges and the top in Soft Suede. But I may have got a bit carried away as I not only did the box, but also did the punch and would you believe the ribbon too.

Friday, December 10, 2010

Quick & Simple Christmas Cards

You always need some quick and simple Christmas on hand for those times you need an extra card. Here are two cards I created that are so easy to put together. White and red is such a great combination for Christmas.


The first card uses the fantastic ornament punch and some paper from the Christmas Cocoa DSP (this was available in the Dressing Up Christmas special which finished 30th Nov). On the inside I added half an ornament along with the Merry Christmas from the Christmas Greetings stamp set.

The second card uses the wreath from the Welcome Christmas Stamp Set, which I stamped in Old Olive and coloured in the berries with Real Red.


Wednesday, December 8, 2010

Some Christmas Goodies

I needed some goodie bags to house some treats for some special girls who came over the other night, so used the treat bag I created a couple of posts ago (see here). These are great to hold some special goodies.

I used Early Espresso cardstock, the Jolly Holiday DSP and the Sparkly & Bright Stamp Set.


Inside the Treat Bags I added a sheet of christmassy owls (sorry the photo looks fuzzy, but it is just the reflection from the cellophane bag). These owls are on dimensionals which are then stuck using double sided to the background cardstock, they can then be removed and stuck onto any project they like.

I also added a little bag of chocolates (a treat bag has to have some choccie treats), the mini post it note holder and a little container of Stampin' Up! goodies (brads, buttons, etc).


Sunday, December 5, 2010

Christmas Post It Notes

These were some quick and simple little Christmas Post It note holders I created. I didn't get this idea from just one place, there are lots of these on the internet so if you want some more ideas just do a search and I'm sure you will come up with lots.

When working out your measurements you want to add 1/8" to the length and width of the post it notes that you are using, plus some for the depth. I split my mini post it note into four pieces (a whole one is a bit fat). On the front I used the Christmas 'Joy' Stamp from the Stampin' Up! Perfect Punches Stamp Set and the Holly Jolly Rub Ons (which go perfectly with the Jolly Holiday DSP).


The Crop A Dile is perfect for punching a hole through the whole lot with such ease, for the ring thingy (I just can't remember what they are called at the moment). I added a sparkly brad I had picked up somewhere on my travels and Voila - a cute little post it note.

Welcome Christmas Treat Bag

This is a fabulous treat bag that we made at Regionals this year. It is such a simple yet effective idea. How do you get that fantastic look - why it's just 2 Fancy Favor Boxes. He he he.

I have made quite a few of these now, and this one uses the Welcome Christmas stamp set.


I have quite a few friends who have 'bowitis' they like bows, but are reluctant to tie bows because they don't think they turn out very well, so to get around this problem I tell them to simply pull the top off that way they don't have to stress about undoing the bow and having to tie it up again.

Tuesday, November 23, 2010

A Treat Bag and Wallet

A good friend brought me a gift from the US, the Greeting Card Kids stamp set from Stampin' Up! It is such a cute set, I love it. I was then inspired by this creation by Angie Kennedy Juda and really wanted to case it.

Instead of a box I chose a bag, which was also one of Angie's creations (see instructions here, she does fantastic video tutorials). The paper I used is Elegant Soiree by Stampin' Up (I love this paper) and the covers for the bag is Crumb Cake (the 'old' Kraft), which I have sponged around the edges. I coloured the image directly with markers and added some dazzling diamonds on her coat (but it is a bit hard to see in the photo). The bag closes with a velcro dot.


My second project is a little treat wallet which was also a creation by Angie (see here). I used the same colour layout as the Treat Bag. Inside the wallet I used the top of the brown paper bag, so you could put a chocolate, gift card or money inside. Kinda cute for Christmas.

Wednesday, November 17, 2010

Melbourne Regionals - Swap 2

Here is my second swap that I created for the Stampin' Up Melbourne Regionals (this one seemed to be the most popular). Well this is not actually the swap, this is the card I used for the swap (I just left out the button on the swaps).

Now there is a story behind this design. I had started by embossing the Cherry Cobbler cardstock with the Vintage Wallpaper Embossing Folder, then I used my brayer to add some Cherry Cobbler ink to one side to give a two tone effect. To fit nicely on a card I had to trim the embossed cardstock, but in my haste I tore the corner, well I was so disappointed as I really liked the effect and I didn't want to throw it out, so after staring at it for a few days I decided to try some Designer Series Paper from the Patterns Stack to the corner and loved how it looked. I think it looks like wallpaper that has been torn to reveal some more wallpaper underneath.


I used the Welcome Christmas and the Tiny Tags stamp sets and the Jewelry Tag Punch for the little Merry tag.

Monday, November 15, 2010

Melbourne Regionals - Swap 1

Well this past weekend was the Stampin' Up Melbourne Regionals. It was a fantastic day, catching up with fellow team members, meeting lots of other demonstrators, and learning so many fantastic new tricks.

I made two different cards for my swaps, this is the first one. I used the Morning Cup stamp set and the Take a Sip Wheel. The colours I used were Pear Pizazz, Blushing Bride, Early Espresso and Kraft and the card was sponged with Soft Suede. I watercoloured the image with my Aqua Painter (these are brilliant and so easy to use).


Here they all are bagged and ready to be swapped, hopefully those that received them liked them.

I will be back with the other one on my next post.

Saturday, November 13, 2010

The Wallpaper Effect

I love the Wallpaper effect, and I wanted to try out inking up my Vintage Wallpaper embossing folder, I used my brayer to ink up one side of the embossing folder with Crumb Cake, put your paper in and run it through the Big Shot (love my Big Shot) and voila, a beautiful two tone wallpaper effect. I had this piece done and sitting on my desk for so long just waiting to be used. When I finally got my Welcome Christmas stamp set, I thought it would go perfectly together.


I added a cheats bow to the card by using a strip of ribbon and a separate bow made by tying linen thread and a button around some ribbon. I just added the image stamped in Crumb Cake onto Very Vanilla cardstock and sponged the edges.

On the inside I added a panel with the same image in the corner, sponged edges and a Christmas sentiment.


Thursday, November 11, 2010

A bit of Joy


I loved the simplicity of Andrea Walford's creation (see here) and just had to CASE it.

I decided to do a standard C6 size card and used some retired Soft Suede grosgrain ribbon instead. I think the diamantes on the snowflakes just makes it pop.


I used some Soft Suede cardstock and white cardstock for the inside too.

Tuesday, November 9, 2010

Love the Flock

One of the things I loved about the Christmas Cocoa Specialty Paper was the "flock".

This was a super easy and quick little set to put together, using the gorgeous Christmas Cocoa flocked paper. The card is a 3" x 3" card in Whisper White with a 2 1/4" x 2 1/4" piece of flock paper, satin bow and sentiment strip.


The gift bag uses the Fancy Favor Die by Stampin' Up!, a satin bow and sentiment strip.

Oh so simple!!!

Sunday, November 7, 2010

Just Add Ink - #42

Since I am finally under some sort of control with house chores, and classes etc, I decided to give this week's Just Add Ink Challenge a go. I just got a cute new set that is coming out in the new Mini Catalogue (to be released 1st December) and thought I would use it for this challenge, and give you a sneak peak.


This week's challenge was a sketch challenge, and it made it so easy to put my card together.

I love these flowers, they are so easy using the scallop circle punch, I have used the Elegant Soiree DSP (love that paper) for the flower and added a Vintage Brad. The base card uses Early Espresso (although it looks darker in the photo than it is IRL), and I added some Early Espresso Satin Ribbon.

On the inside I added my Happy Birthday and a little birdie in the corner.

Friday, November 5, 2010

Welcome Christmas

I loved the Welcome Christmas stamp set when it came out in the new Stampin' Up! catalogue and at the moment it is even better with the current special where you can get it and the Christmas Cocoa Specialty Paper for $69.90 (wood block style) or $59.90 (clear block style) and get a free spool of ribbon. I was inspired by the fantastic Kimberley Van Diepen (see here creation in her post here).


This was actually a very simple card. I used Crumb Cake as the base card with Early Espresso and the Christmas Cocoa Specialty Paper. Add some Early Espresso Taffeta Ribbon and stamp in Early Espresso and White Craft ink.

To do the centre image I created a mask for the tag (from the Lots of Tags Sizzlet set by Stampin' Up) so that I could stamp the image without getting it around the edge of the tag, then sponged the edges with Early Espresso.

On the inside I added the greeting and some more snowflakes using the small snowflake from the Snow Swirled stamp set.

Yeah, its the weekend so enjoy.


Tuesday, November 2, 2010

Holiday Line Up Set

The Holiday Lineup stamp set by Stampin' Up! is sooo cute. These guys always make me smile and are perfect for not just Christmas Cards but also some Christmas gifts. This will be a class coming up later in November and consists of 3 cards and 3 treat pouches.

The cards have been CASE'd from my dear friend Debbie (who held a class on these guys last year). I have used some retired Ski Slope DSP and Holiday Treasures DSP and retired In Colour ribbon from 2009/10.


I loved making these treats last year - Snowman Soup, Reindeer Poop and Rudolph's Red Nose Repair Kit. Now there are lots of these around on blogs and you can find lots of poems to go along with them if you do a search. I have put the Snowman Soup poem on the back of the Top Note.

The Snowman Soup pack consists of Hot Chocolate mix, Candy Cane, Marshmallows, and a Chocolate (Santa) - all the things you could possibly need to make a yummy Hot Chocolate.


Sunday, October 31, 2010

Dasher Set - Christmas Class

I love how Stampin' Up! have started putting out some single stamps and the Dasher stamp is fantastic. Team it with the Christmas Greetings stamp set, some cardstock, Jolly Holiday DSP and Taffeta ribbon and it is a great way of being able to do some quick, simple and inexpensive Christmas Cards. My class this Friday is a set of 6 Dasher Christmas Cards and a box to store them in.

Saturday, October 30, 2010

A Red & White Christmas

The other day I was playing with some of the new Stampin' Up! Christmas Cocoa Designer Series Paper which you can only get when you purchase the Welcome Christmas Bundle available only until 30th November and was inspired to get out my Real Red cardstock. I have been using Cherry Cobbler quite a bit as it goes beautifully with the Jolly Holiday Designer Series Paper.


This card is where I started, I loved the effect of the 'furry' (or flocked) damask paper and it worked perfectly when simply punched out using the Ornament Punch. I layered white with Real Red to give a framed effect and stamped the Noel stamp from the Many Merry Messages stamp set.


I loved the clean look of the card so decided to make a few more using different ornaments.


I ended up making a set of 4 cards, the cards are 4 1/8" square, I used some of the Delightful Decorations ornament stamps (one of them is embossed in white embossing powder). I also decided to mix up the bows, I've used white taffeta, red taffeta, white grosgrain, and some white string.

Have a good weekend.


Wednesday, October 27, 2010

I'm Back with a new Craft Room

I know, I have been missing for sometime now, so I better let you know what I have been up to (besides the tooth saga, which btw only finished last week with the proper insert being fitted - it does look pretty good, and so it should for that price!).

Well I decided a couple of months ago that I was going to move my craft room to my other 'spare' room (it is a bit larger and we always seem to need more space for crafting - lol!). I am currently on 2 weeks annual leave from work (this is the second week), so I spent the first week moving rooms - wow talk about the amount of stuff you uncover when you move!!!

I love these cabinets and I moved them all by myself - thank goodness there wasn't a candid camera around because they are taller than the doorways and the double ones are pretty heavy, I managed to trap myself into corners more than a few times. They store all my cardstock, DSP, business stuff, stamps, and much more. You will see I have my stamps on one of the shelves (2nd from left) and my Christmas stamps are in the far right shelf, makes it so much easier to find what I need. I got these units from Ikea, but it was some years ago so not sure if they are still available.


This is my Big Shot and Circle Scissors station - I am loving this spot. The magazine holder stores all my plates (large and small), and the Dies are stored underneath in the baskets. The table was also from Ikea, the legs are adjustable which is great to get it at just the perfect height (especially when you are a little shorter than most).

See that little step - that is so that I can get to things on the top shelf (or sometimes the middle shelf!). And my little shredder sits on the other side.


This is the view to the opposite corner of the room (from the Big Shot Station). My desk actually goes with the cabinets and is nice and deep. The table that runs under the window is one that I "whipped up" just for that spot. Well actually I went to Bunnings and bought the top (laminated chipboard), but they didn't sell metal adjustable legs, so I drove another 20 mins to Ikea to get some legs, then realised the screws that came with the legs were too big for the table top, so back to Bunnings I went for my screws.


My TV now sits on the additional table which gives me so much more room on my desk. I have some drawers on my desk which house miscellaneous bits and pieces - stapler, paper clips, glues, ribbon offcuts, etc. I also found these ribbon holders online which houses my taffeta and satin ribbon. Also on my desk - my markers, Stampin' Scrub, and some containers with precut Top Notes, embossed cards and folded card bases. Oh in the two desk drawers are my old style punches.


On my new table is my laptop, my sponge storage, my tool caddy, my Stack & Store and Colour Caddy. Underneath are more storage cabinets where I keep all my Neutrals cardstock, various tools, ribbons, etc.

To the right (and to the left of the Big Shot Station) is the wardrobe which I have also set up shelving with more stuff!!!) - sorry no photos.


Well I hope you liked the tour of my new craft room, sorry it was so long. I love playing in this room now and spent all day yesterday creating. I will start posting my creations tomorrow - must go now I am off to catch up with a fellow stamper (love these type of holidays).


Tuesday, October 5, 2010

A Very Expensive Tooth & A Piece of Cake

Well I have had a very eventful weekend, but let me show you my project first (because there will be quite a bit of waffle to come).

This gorgeous cake box was created by Kay Sha and she has a fantastic tutorial available to purchase on her blog (see here). I decided to create a card to match and used the same flower design and the scallop to match the cake. I am going to make lots more of these to make a full size cake, but for now 1 slice is enough!!!


Now for my eventful weekend - well Sunday afternoon I broke a tooth on some ice-cream (yes you read correctly!!). Now I am a real woose when it comes to the dentist, I have a bad jaw and keeping my mouth open for longer than 60 seconds results in extreme pain, but unfortunately with a quarter of my tooth missing I had to do something. I managed to get into a new dentist this morning and thankfully after explaining my jaw issue, he suggested a jaw wedge so that I could rest my jaw and he could still work on the tooth. YEAH it worked (why didn't the other dentists suggest this), but then came the outcome of my broken tooth, the damage was too big to simply using a filling to build it back up - I needed a porcelain insert to try to save the tooth at > $1,000 - ouch. So I left the dentist rather pleased that it was not as painful as previous times but quite a bit out of pocket!!!

Thursday, September 30, 2010

More Mini Milk Cartons

These are some more mini milk cartons for my upcoming class. I used the Elegant Soiree DSP and Greenhouse Gala DSP. The little flowers were the same as the ones on the Elegant Soiree Tube Boxes, using the Boho Blossoms punch.

Tuesday, September 28, 2010

Mini Milk Cartons for Christmas

I love the Mini Milk Cartons, they are oh so cute. I have been preparing for a Mini Milk Carton class which will include 6 mini milk cartons, for gift giving and Christmas.

For the Christmas ones I made a little set of Christmas Mini Milk Cartons and a little holder for them to sit in. The flower was made simply with 3 scallop circles from Designer Series Paper.


The new Jolly Holiday Designer Series Paper is perfect for Christmas and I love the new Cherry Cobbler teamed with Very Vanilla and Old Olive (very traditional for Christmas).

The little Merry Christmas is from the Delightful Decorations set.