Saturday, December 18, 2010

A Merry Christmas Matchbox

Another idea for a Christmas Table treat is a little Christmas Matchbox.


I used the Square Lattice Embossing Folder to give some texture to the Matchbox cover. The label comes from the Lots of Tags die with my favorite 'Merry Christmas' stamp (from the Contempo Christmas stamp set) and a little button.

The Hershey chocolates were covered in Jolly Holiday DSP. I went to Costco to get the Hershey Chocolates, the problem is that Costco is a bulk store, so they only sell them in 1.5 kg bag - I do still have a few left!!!

Friday, December 17, 2010

A Sparkly & Bright Make & Take

What do you do when you have 1 hour to come up with a make and take (nothing like leaving things to the last minute) - CASE a talented lady. I really liked these cards created by Marelle Taylor, so I changed it up a little by adding a Whisper White cardstock with a Scallop Trim Border. I also made a little Sunny Boy treat holder and voila, I had 2 quick and simple make and take projects all prepared and 1 hour, and I just made it before the girls all arrived - PHEW.


I had lots of different paper prepared, with a Cherry Cobbler or Old Olive card base, so the girls could choose what combination they liked.

I only recently bought the Sparkly & Bright Stamp Set and was so glad that I did.


The Sunny Boy containers are a great idea for Christmas table favours. They are great to put some little chocolate balls in for a sweet treat.

Thursday, December 16, 2010

My Retro Christmas Tree Card

I think I was just in a bit of a funky, retro mood when I created this card. I had seen punched newspaper print used on some other cards to create a background and thought why not make a Christmas Tree.

I used Naturals Ivory Cardstock, the Newsprint DSP and the Ornament Punch - how simple is that. I sponged all the edges of the card and the ornaments in Soft Suede, then added a sparkly 'star' (which is from the Boho Blossom Punch) and Noel from the Many Merry Message Stamp Set.


On the inside I added another ornament and the Merry Christmas from the Contempo Christmas (love that stamp).

I took a whole stack of cards into work and this was the most popular one - go figure, I liked it too, but thought it may have been a bit to funky/retro for others.

Wednesday, December 15, 2010

A little bit of Joy

Isn't it annoying when photos really don't do something justice - the red background on this card actually sparkles like there is no tomorrow, but unfortunately you just can't see it in the photo : (

This card came together pretty quickly. I had done a lot of cutting out images recently and just couldn't bring myself to cut out the JOY from the Welcome Christmas stamp set, but I wanted to show it off a bit more. Now none of the label dies or punches I had would fit the image, so I created my own. Can you guess what I used?


This photo will probably help you out, need another hint it - you need three of them to create it.

I used the Square Lattice Embossing Folder on the Real Red background and then sprayed it with my Champagne Mist (Champagne Shimmer Paint and Isocol) - I really did spray it!


Sunday, December 12, 2010

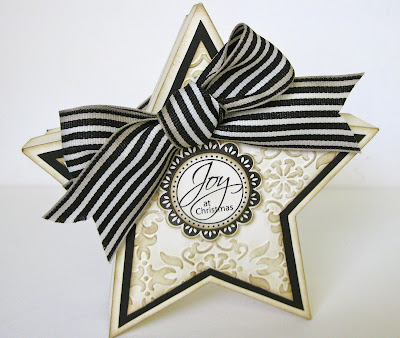
A Vintage Star

I was so inspired by the very talented Paula when she posted her gorgeous Star Box (see her stunning creation here), I just had to create one myself. The template is from Lauren Meader and is so perfect for Christmas.


I added the Christmas stamp from the Perfect Punches Stamp Set and some striped grosgrain ribbon.

I decided to vintage mine up a bit more and sponged all the edges and the top in Soft Suede. But I may have got a bit carried away as I not only did the box, but also did the punch and would you believe the ribbon too.

Friday, December 10, 2010

Quick & Simple Christmas Cards

You always need some quick and simple Christmas on hand for those times you need an extra card. Here are two cards I created that are so easy to put together. White and red is such a great combination for Christmas.


The first card uses the fantastic ornament punch and some paper from the Christmas Cocoa DSP (this was available in the Dressing Up Christmas special which finished 30th Nov). On the inside I added half an ornament along with the Merry Christmas from the Christmas Greetings stamp set.

The second card uses the wreath from the Welcome Christmas Stamp Set, which I stamped in Old Olive and coloured in the berries with Real Red.


Wednesday, December 8, 2010

Some Christmas Goodies

I needed some goodie bags to house some treats for some special girls who came over the other night, so used the treat bag I created a couple of posts ago (see here). These are great to hold some special goodies.

I used Early Espresso cardstock, the Jolly Holiday DSP and the Sparkly & Bright Stamp Set.


Inside the Treat Bags I added a sheet of christmassy owls (sorry the photo looks fuzzy, but it is just the reflection from the cellophane bag). These owls are on dimensionals which are then stuck using double sided to the background cardstock, they can then be removed and stuck onto any project they like.

I also added a little bag of chocolates (a treat bag has to have some choccie treats), the mini post it note holder and a little container of Stampin' Up! goodies (brads, buttons, etc).


Sunday, December 5, 2010

Christmas Post It Notes

These were some quick and simple little Christmas Post It note holders I created. I didn't get this idea from just one place, there are lots of these on the internet so if you want some more ideas just do a search and I'm sure you will come up with lots.

When working out your measurements you want to add 1/8" to the length and width of the post it notes that you are using, plus some for the depth. I split my mini post it note into four pieces (a whole one is a bit fat). On the front I used the Christmas 'Joy' Stamp from the Stampin' Up! Perfect Punches Stamp Set and the Holly Jolly Rub Ons (which go perfectly with the Jolly Holiday DSP).


The Crop A Dile is perfect for punching a hole through the whole lot with such ease, for the ring thingy (I just can't remember what they are called at the moment). I added a sparkly brad I had picked up somewhere on my travels and Voila - a cute little post it note.

Welcome Christmas Treat Bag

This is a fabulous treat bag that we made at Regionals this year. It is such a simple yet effective idea. How do you get that fantastic look - why it's just 2 Fancy Favor Boxes. He he he.

I have made quite a few of these now, and this one uses the Welcome Christmas stamp set.


I have quite a few friends who have 'bowitis' they like bows, but are reluctant to tie bows because they don't think they turn out very well, so to get around this problem I tell them to simply pull the top off that way they don't have to stress about undoing the bow and having to tie it up again.